

Need help in starting your own online shop with Shopify? Here, you will be given everything you need to do that in a simplified manner so your online store can be up and running in a jiffy.
How to Set up Your Online Shop on Shopify
Are you ready to learn how to create your own online store? Maybe you just came up with a wonderful product idea and now you’d like to see if people are willing to buy it. Well, you’re in luck, because you no longer have to be an experienced web developer to build an online shop, and eventually, it can be done pretty easily with Shopify.
So, first of all, you need to sign up for an account. Signing up with Shopify and starting your one store couldn’t be any easier and they even offer a 14 day free trial to get you going.
Step 1: Getting Started with Shopify Online Stores Service
Getting an online store with Shopify is simple and user-friendly. They will even offer you a 14-day trial so that you can test things out.
- First, you have to open a Shopify account if you haven’t done it already.
- Fill in your details in the signup form, then click on the ‘Create your store now’ button.
- Select a store name that’s unique and hasn’t been taken. Shopify will highlight names that are already in use and request you choose another if what you have in mind has been taken.
- Afterward, you will be taken to another page where you have to provide more details like your name, location, and contact details.
- Shopify will want to know what products you want to sell on their site. If you’re just testing out the site, in the ‘Do you have products?’ Dropdown menu, select ‘I’m just playing around’ and in the ‘What will you sell?’ section, answer with ‘I’m not sure’. But if you do have products to sell, then enter their details.
- If you have finished filling in the details, click the ‘I’m done’ button.
Start Shopify store, a complete one-stop-shop eCommerce platform >>>
Step 2: Building Your Online Store
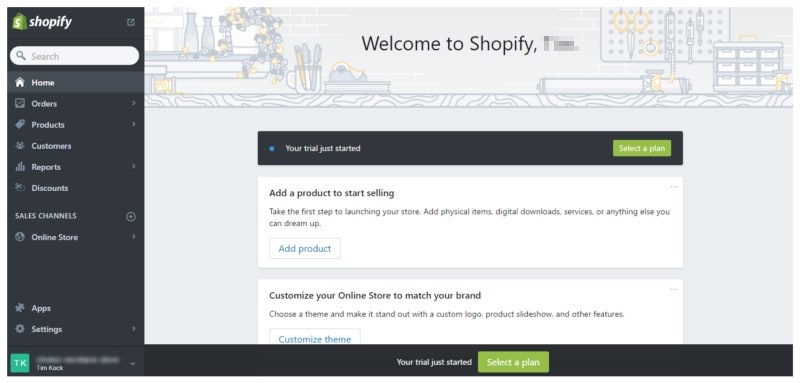
You will be taken to your store admin page after completing the signing-up process.
This is the stage you start building up your online store, getting your products uploaded, and establishing your payments and shipping processes.
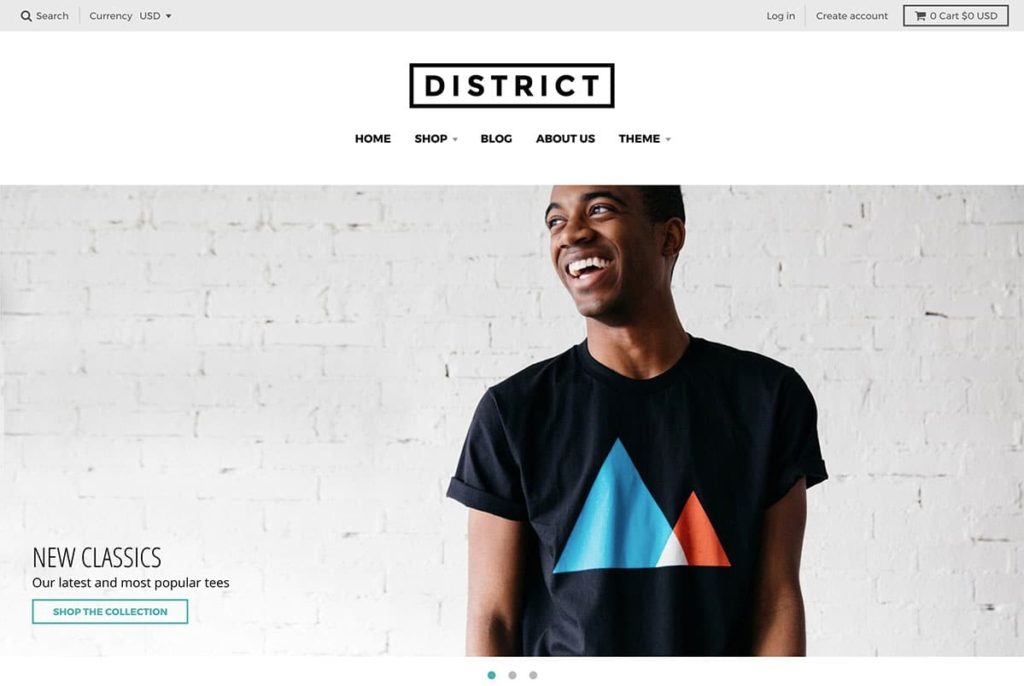
Step 3: Establishing How Your Online Store will Look
You will like your store to stand out from the others and reflect your personality, right? You can do this with themes that will allow you to personalize it the way you want. These themes are available at the official Shopify theme store.
Every theme got a list of modifications that can be applied to it, but, you don’t have to be a tech wiz or coder as the modifications list for the themes is user-friendly and simple to use. More modifications are available with premium themes but your site will still look great with free themes.
And just in case you want to deeply change your online store theme, it’s very simple by using HTML and CSS which gives you a lot of options to work with. As we implied earlier, you don’t have to be a software guru to be able to do this as you can call on a lineup of design agencies also known as ‘Shopify experts’ to personalize your site to your taste.
You could configure your site this way:
- Theme – Brooklyn (free theme)
- Shipping – Free to all countries
- Payments – Shopify payments can be used if you’re in the US, Puerto Rico, Canada, UK, Ireland, or Australia. Use Paypal if you’re outside these countries.
- Pages – This should contain your contact details, refund policy, privacy policy, and service terms.
- Free shipping page – Used to explain how the shipping is done.
Step 4: Changing Your Shopify Settings
Most of the themes on Shopify will allow you to personalize your site anytime you want by making changes to how it looks, so your store can be unique.
Step 5: Uploading Products onto Your Store
Go to the bar on the left and select ‘Products’. On that page’s top right-hand corner is a blue ‘Add a product’ button. Use that page to provide as many details as possible of your products, most especially those that will aid your SEO campaigns like name, description, and URL. Provide details about the variations of your products in order to better inform your customers.
You will also upload your product pictures on this page. You don’t need to worry about uploading them in a particular order as they can be rearranged easily on the page.
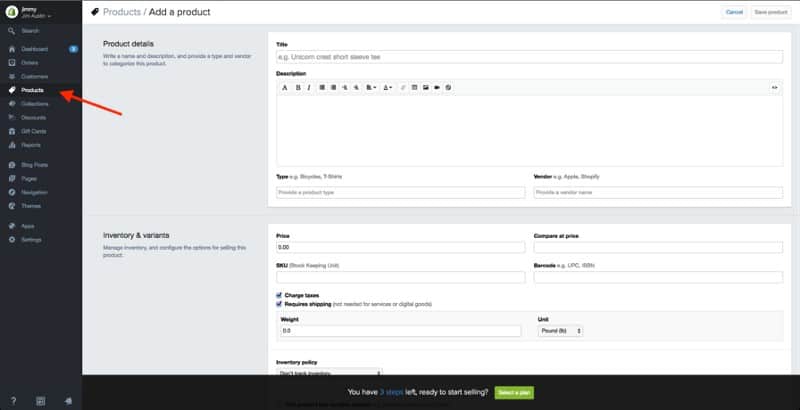
How your products look is an important factor in sales so make sure your images show them in the best possible manner. Use close-up pictures to draw attention to special or unique features. Make sure the images are all of the same dimensions so that your site looks neat. Cluttered and untidy sites could be a turn-off to prospective customers.
Once all your products are uploaded, click on the ‘Save product’ button at the right-hand corners at either the top or bottom of the page
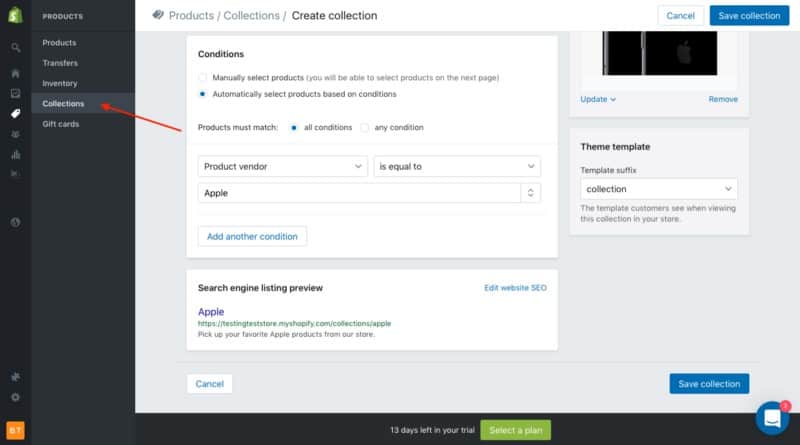
Step 6: Setting up Product Collections on Your Store
Collection refers to a group of products with similar features that customers might want when they visit your store. For instance, they could be on the lookout for the following collections:
- Unique men’s, women’s, or children’s clothing.
- Certain items such as lamps, cushions, or rugs.
- Items that are on special sales.
- Products of a particular size or color.
- Seasonal products for certain occasions like chocolates for valentine, Christmas decorations, Easter eggs, etc.
Collections can be made of any combination of products. Make sure you display your collections on your home page and the navigation bar. This will make it easier for customers to find what they are looking for and avoid the stress of going through the whole catalog.
There are two options to select when adding products to a new collection in your store. The first option involves listing the products by hand while the second option involves doing it in an automated manner. This is done by establishing a setlist of conditions for products to be listed. Once a product fulfills these conditions, it’s automatically listed in the collection.
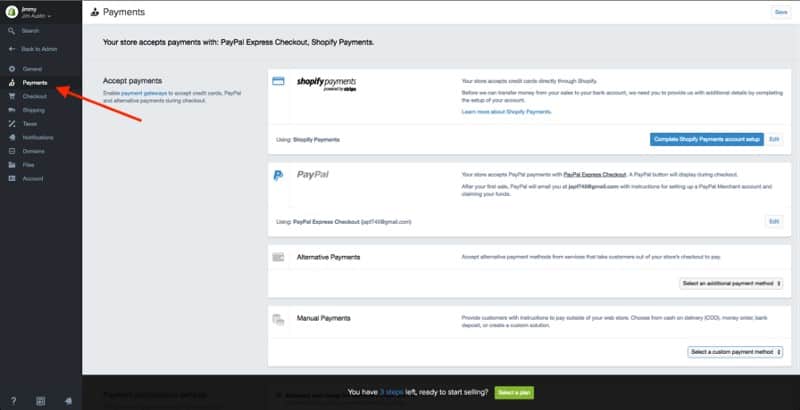
Step 7: Collecting Payments
Customers will pay for the products on your site through a payment gateway that will be integrated into your site. Not all payment gateways have the same offerings so you have to scrutinize their features carefully.
Here are the things to check when determining which payment gateway to use for your business.
Transaction Fees
Payment gateways make their money by collecting a small percentage of the sale you make or a flat fee per transaction. Look at how much you forecast for your sales and decide which of the approaches will be best for your transactions.
Mode of Payment Accepted
You will have to know what cards and payment solutions are accepted by your payment gateway. VISA and Mastercard are accepted by all of them. A majority will take American Express while an increasing number are opening up to online payment solutions like Paypal. Make sure the payment gateway you choose will be able to handle the well-used cards and online payment.
Checkout
Some payment gateways will process sales transactions on their own servers through a form on their site, implying that the customer has to navigate away from your own site’s checkout. But they are redirected back to your confirmation page after a successful transaction allowing you some control of the checkout process. This allows you to bypass Shopify’s restriction on customizing your checkout with any other tool apart from CSS.
Usually, Shopify adds the transaction fees of the payment gateways to its own handling fees. But right now, stores in the US and UK can use Shopify payments so there should be some reduction in the combined charges to store owners. Having an integrated payment solution will help you to reduce friction in accepting and transferring money, compared to many other eCommerce website builders, so Shopify is the best pick we got.
It’s also possible to make some savings on these costs. That will depend on your Shopify plan. These are the rates you will get according to your plan.
- Basic – 2.4% plus 20p
- Professional – 2.1% plus 20p
- Unlimited – 1.8% plus 20p
It could be worth moving up to a higher plan if your site makes enough transactions to support it so that you could take advantage of the savings.
Your store will make use of Shopify payments by default if you’re in the US or UK. If you prefer this option, click on the ‘Complete Shopify payments account setup’ button under the settings on the payments page. If you, however, prefer a third-party payment gateway, navigate to the ‘Enable payment gateway’ link on the same page.
Step 8: Going Live with Your Online Store
Now it’s time for your store to go live right? Not quite yet! There are still some more details to be sorted out like adding some more information about your company, how you intend to deliver customers’ purchases, and your tax payment structure.
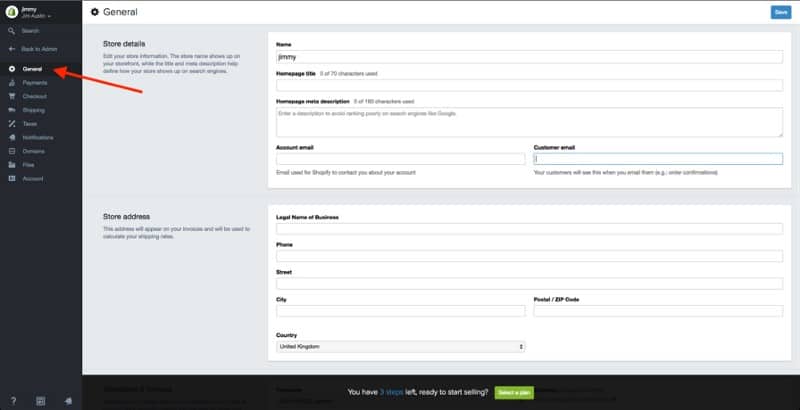
General
All information about your business goes on the page highlighted below marked as ‘General’. Ensure you make use of the Google Analytics feature on this page. It will help you track store visitors which will empower you to make modifications to your business model if necessary.
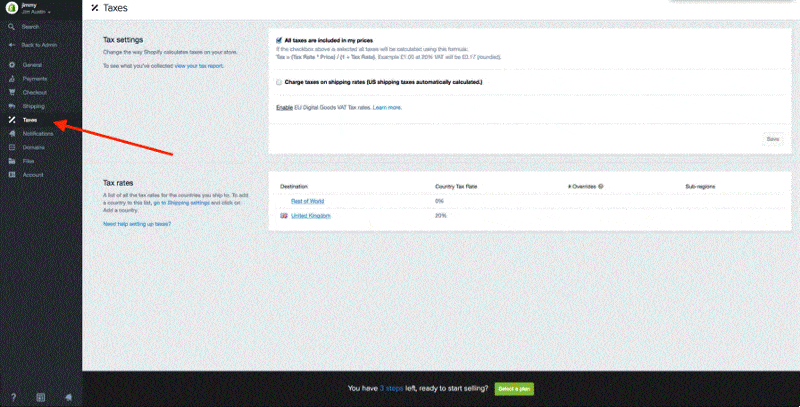
Tax Settings
Now let’s configure the taxes in your newly created Shopify store. It’s important to mention that based on if your business is VAT registered or not, it will determine the need to charge VAT.
In case you are VAT registered and you will sell products to both businesses and consumers in different EU countries, don’t forget to configure the tax rates and set them accordingly. Setting your taxes properly, it’s an important part of making money on Shopify.
- Go to the products section of your admin page.
- Click the name of any of your products.
- Go to the section called ‘inventory & variants’.
- Open a dialog window by clicking on the edit link next to your product variant.
- Check the boxes next to ‘Charge taxes’ and ‘Requires shipping’ if these are required for that product.
- Some products like digital goods will not require the charging of taxes or shipping costs due to their nature. Physical products, on the other hand, have to bill for both.
- If a product requires shipping, enter the product’s weight in the field designated for it.
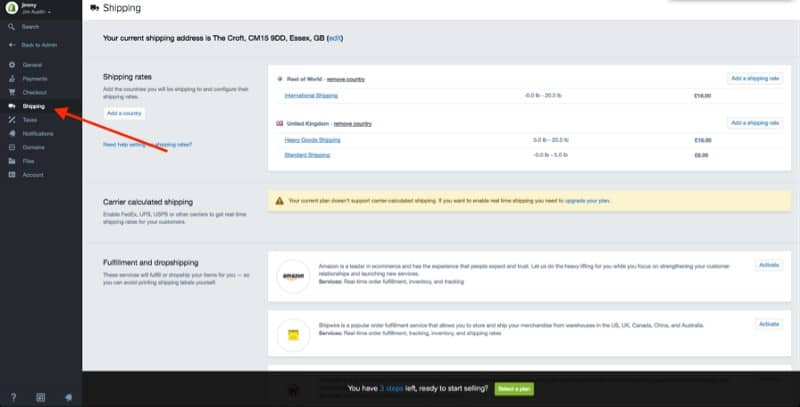
Shipping
Ensure you have the right rates as failure to do this could harm the sales of your store and eventually will hurt your earnings because you will have to cover the price of the shipping from your own pocket. Do the following to make sure of this:
- Go to the shipping page from your admin page and click on settings.
- Under ‘Shipping rates’, set a weight-based shipping rate for your product according to its weight.
Step 9: Ensuring Your Order System Works
You will need to test and ensure that your site order system works. This can be done by using Shopify’s Testing Gateway.
- From your store admin page, click on settings, then navigate to payments settings.
- You will have to deactivate your credit card gateway if it’s on. To do this click ‘Edit’, then click on ‘Deactivate’. Confirm your deactivation afterward.
- Go to the ‘Accept credit cards’ section. Click on ‘Select a credit card gateway’. A dropdown menu will open.
- Go down to ‘Other’, and then click ‘Testing Gateway’.
- Under ‘ Testing Gateway’, click ‘Activate’.
- Place an order on your online store as if you’re a customer.
You can also test the workings of a payment gateway with a real transaction. Ensure the gateway you’re testing has already been set up in your store.
- Buy a product from your own store like a customer and use your own credit card details to complete the transaction.
- Then, cancel the order at that moment so that you don’t pay any transaction fees and get your money back.
- Check your payment gateway to see if your money went through the checkout.
- You got it!
Of course, it’s a completely free flow, just be sure to cancel that order as mentioned. If the credit card has been billed after you’ve placed the order but before you canceled it, the transaction will appear on your bill.
There’s still the opportunity to cancel after paying Shopify but your refund will be in the form of a transaction credit on your account which could be useful for paying future transaction fees.
Conclusion
And that’s pretty much all you need to know, in order to start up.
You sign up to Shopify, set up a theme, add products, set up your collection, tax, and shipping policies, some payment getaways, and vualá, you got an online store.
After those 8 steps, you will have a great-looking, unique, and fully-functioning store in less than half an hour without having to be a web expert. This way you can spend most of your time marketing and concentrate on your business instead of taking care of the technical side of things. Shopify is amazing!
If something is still not clear, feel free to contact me in the comments or write to us in our Facebook group.
Start a Shopify store, complete one-stop-shop eCommerce platform >>>
My website is hosted on DreamHost which I really like due to its stability and helpful support. Furthermore, their servers are extremely reliable, secure and fast, I don't remember when the last time we had a server downtime. If you sourcing for a great hosting service, go grab it.
- AI-Powered AML Monitoring: Reducing False Positives - March 9, 2026
- Master Oracle Transportation Management (OTM) with Industry-Focused Training - February 25, 2026
- How AI is Changing Google Rankings - February 3, 2026
Thanks for the steps. As per my experience, it is always better to test manually like checkout process and payment method before live the store
A very illuminating article about setting up an online store. About the best expose on this subject matter.
Thanks. How was your experience in setting up an online store?